Objective:
Have basic setup of the centos 7.x linux setup in virtualbox and use it further for hosting RDBMS or any application we are interested in.
Steps:
Download:
1) The minimal version of centos is downloaded (1GB in size) from http://isoredirect.centos.org/centos/7/isos/x86_64/ redirected to http://centos.excellmedia.net/7.9.2009/isos/x86_64/CentOS-7-x86_64-Minimal-2207-02.iso
OS setup:
2) Vitualbox->File->Preference->Network->Use Add symbol on the right side pane ->Add "Nat Network" with "Support DHCP" checked (default enabled)
3) Setup centos -> choose English(US) lanuguage -> Choose Timezone of your choice -> Let the setup continue and complete
4) On the login prompt -> enter root|password
5) Poweroff the machine
Nat Network setup:
6) Go to the newly created machine settings -> Network -> Choose "Nat Network", this will allow your vm to talk to other VM in the Virtualbox Ecosystem and also to the internet. Ideal choice if your planning to setup multiple VMs (like primary and standby config).
7) Power on the VM
To enable the IP and internet on the VM:
8) Run ip a, this should list the interfaces you have enabled before (atleast 2 should be there, including the defaul loopback 'lo' interface)
9) Goto /etc/sysconfig/network-scripts, backup the ifcfg-eth file (belonging to the interface, that you saw last).Edit the ifcfg-eth, such that ONBOOT="YES" is set instead of the default "NO". Also check if the BOOTPROTO=DHCP is there, which is the default anyways.
10) Now reboot the machine
11) On boot now you should have both IP address for the ping to "www.google.com" working fine.
[root@10 ~]# ip a
link/loopback 00:00:00:00:00:00 brd 00:00:00:00:00:00
inet 127.0.0.1/8 scope host lo
valid_lft forever preferred_lft forever
inet6 ::1/128 scope host
valid_lft forever preferred_lft forever
2: enp0s3: <BROADCAST,MULTICAST,UP,LOWER_UP> mtu 1500 qdisc pfifo_fast state UP group default qlen 1000
link/ether 08:00:27:5a:b3:dc brd ff:ff:ff:ff:ff:ff
inet 10.0.2.4/24 brd 10.0.2.255 scope global noprefixroute dynamic enp0s3 <<<< 10.0.2.4 is the IP
valid_lft 732sec preferred_lft 732sec
inet6 fe80::5f7e:e18:aa7a:ce49/64 scope link noprefixroute
valid_lft forever preferred_lft forever
[root@10 ~]#
[root@10 ~]# ping www.google.com
64 bytes from maa03s39-in-f4.1e100.net (142.250.195.100): icmp_seq=1 ttl=115 time=100 ms
64 bytes from maa03s39-in-f4.1e100.net (142.250.195.100): icmp_seq=2 ttl=115 time=30.9 ms
^C
--- www.google.com ping statistics ---
2 packets transmitted, 2 received, 0% packet loss, time 1002ms
rtt min/avg/max/mdev = 30.990/65.525/100.061/34.536 ms
[root@10 ~]#
Putty access:
12) Until now you would have performed your operations on a console. Now its time to enable putty access from the Host Machine:
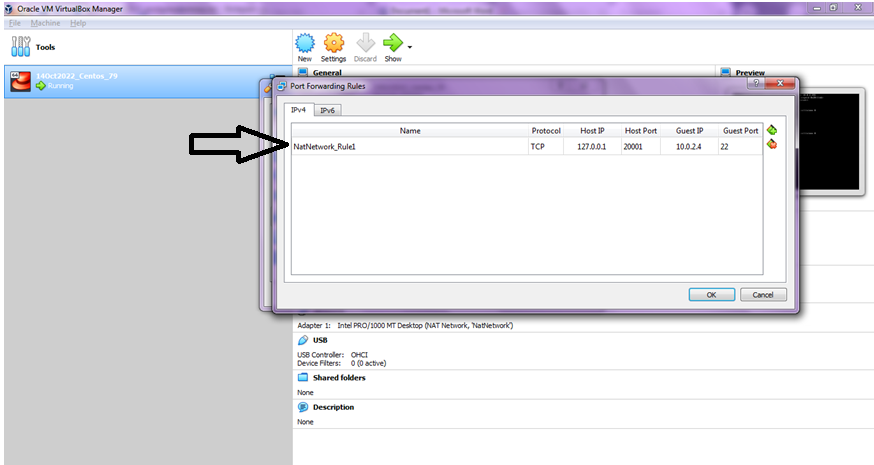
a) Goto Virtualbox->File->Preference->Network->Port Forwarding ->Edit the rule name to something meaningful ->enter "127.0.0.1" in HOST IP, Port number above 20000 (say 20001) in Host Port, -> enter the IP you saw from the "ip a" output into the guest IP, Port 22 into the Guest Port. Save the setting and close the prompts.

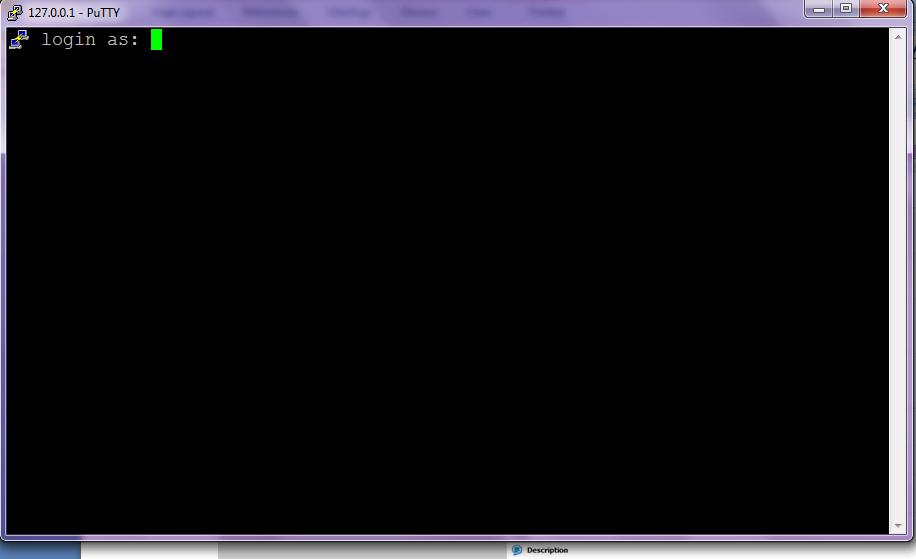
b) Now open putty from the local Host machine, enter 127.0.0.1 in the host address space and port# in the port space.


Your allset with your basic machine setup, from here on you should be able to any further application specific configuration.
Done!!!


No comments:
Post a Comment