Wednesday, September 4, 2024

Oracle KeyVault 21.9 Multimaster setup steps

Oracle KeyVault Multimaster setup steps


First node IP : 192.168.194.122 | voracle8x-oracle-key-vault2

Second node IP : 192.168.194.123 | voracle8x-oracle-key-vault3


Note: the DNS and NTP are manadtory for the multimaster setup. Since I didnt have both available; I didnt try making /etc/hosts in first attempt to honour oracle's requirement not to tamper any setting in the server and use only web UI or restapi or okvutil to do tasks with the machine.


Prereq: Atleast make a NTP server entry in system tab (even if the NTP server isnt reachable from the OKV node 1)


Controller node creation:


1. Backup the existing nodes 

Use backup & restore from the web UI.

workaround: I used the virtual box vm snapshot instead in vm shut state.


2. Once remote backup finishes; go to cluster tab


3. Verify server IP


4. Select "YES" for First node of cluster option


5. Enter node name, this cant be changed later


6. Enter cluster name


7. Enter cluster subgroup name


8. Convert the node to candidate node (eventually this is the first node or controller node in the cluster).


In our case:


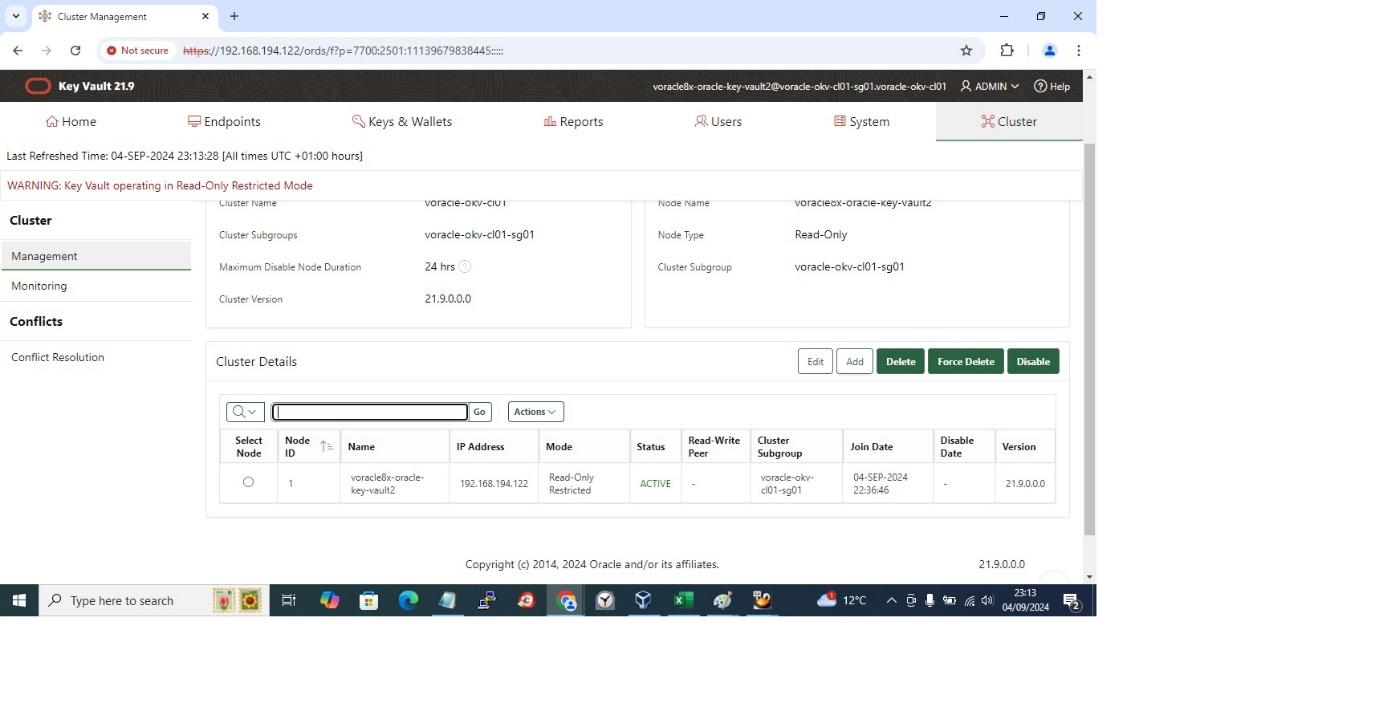
Clustername: voracle-okv-cl01


cluster subgroup name: voracle-okv-cl01-sg01


Issues: The OKV cluster doesnt allow the conversion without NTP server; to mitigate it we tried fixing the port forward for internet. No help, the NTP server is still not reachable. 

Finally we entered the public NTP server 0.uk.pool.ntp.org; the OkV server failed to reach the ntp server. 

But still the conversion worked.


Induction completed until here:


First node IP : 192.168.194.122 | voracle8x-oracle-key-vault2


Pending:


Second node IP : 192.168.194.123 | voracle8x-oracle-key-vault3


Candidate node addition (2nd node in read write pair):


Prereqs: Backup the existing controller or first node.


Candidate node addition steps:

Backup steps:

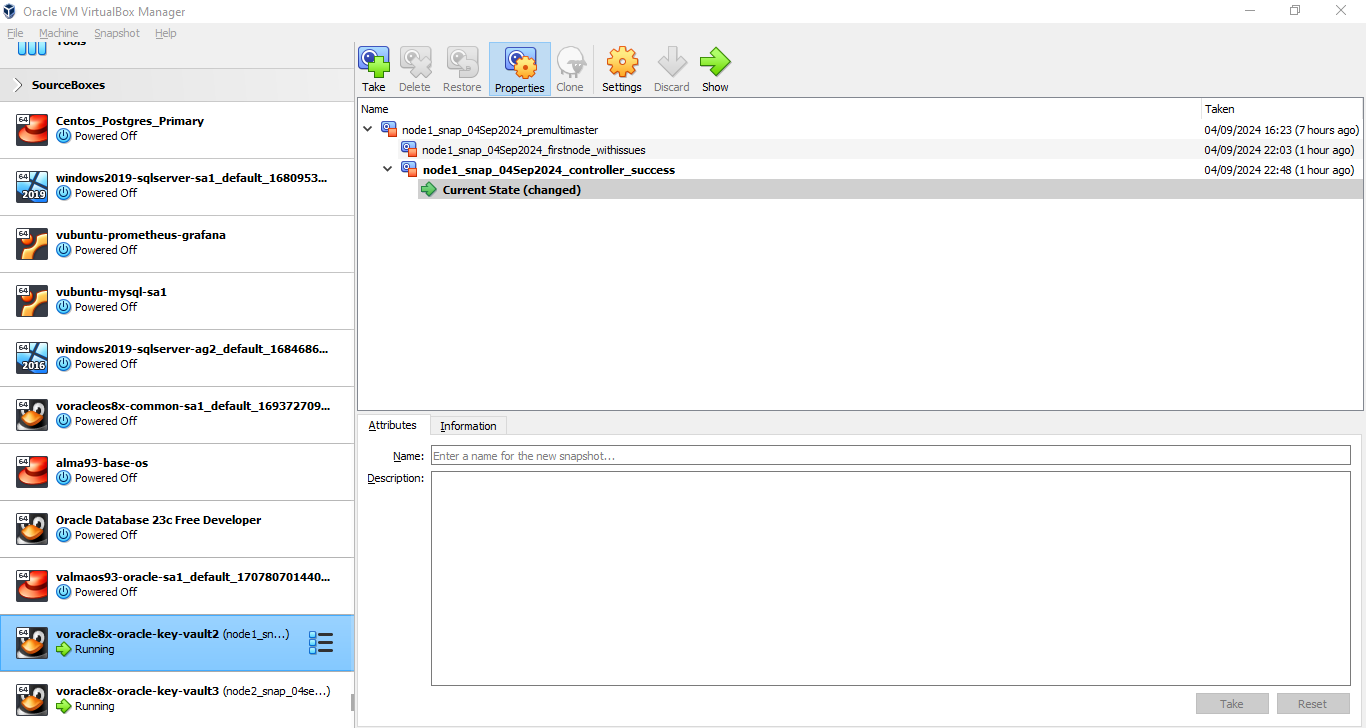
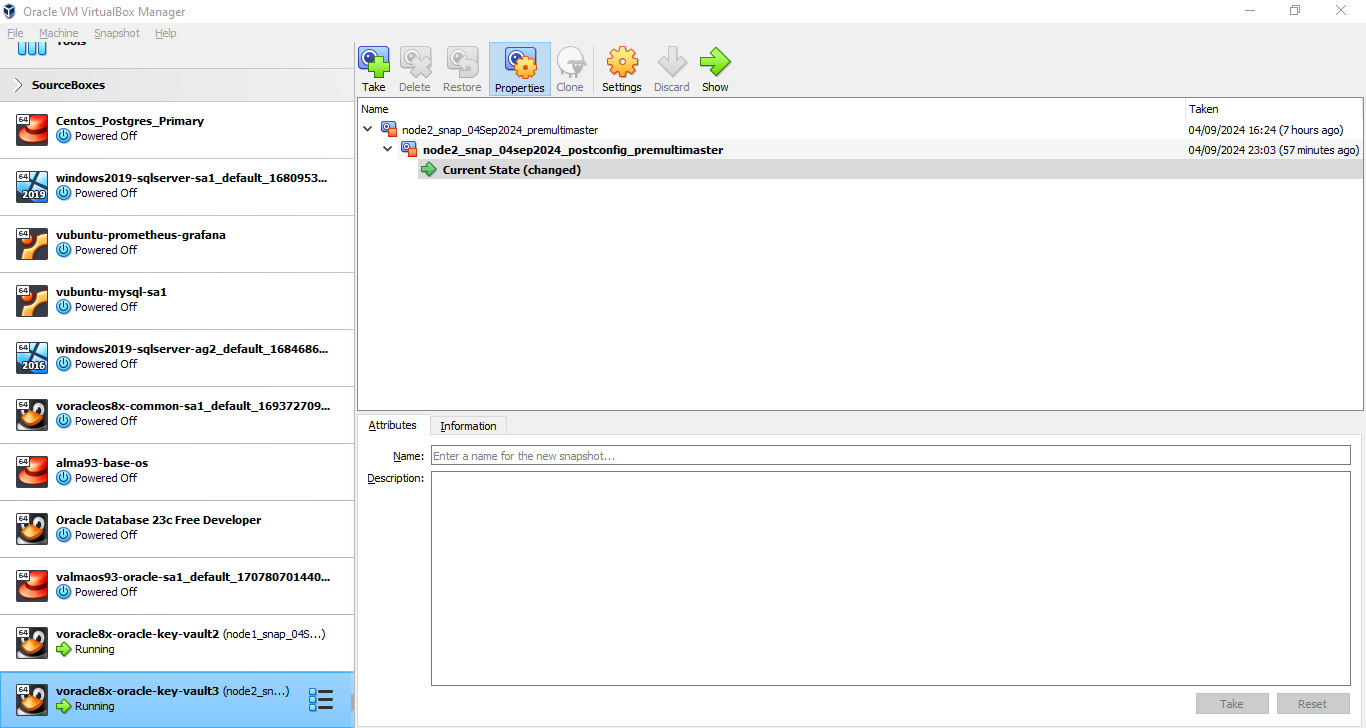
1. shutdown the controller node

2. Take a snapshot of the controller node from virtual box

3. So the backups are

A. Backup as of node1_snap_04Sep2024_controller_success & node2_snap_04sep2024_postconfig_premultimaster
Oracle VM VirtualBox Manager


Oracle VM VirtualBox Manager


1. Login to web UI console as system admin user

http://192.168.194.122 [controller node]

2. Goto system tab

3. click on backup & restore ---- -> backup is already secured

4. Ensure a remote backup is secured---- -> backup is already secured

5. Firewall ports are opened as mentioned in OKV guide (in local lan, it shouldnt be concern) ---> same VLAN and no firewall between

6. Goto cluster tab

7. Click on management tab from left navigation bar

8. Click add under cluster details

9. Add cluster node details to the "add candidate node section"

10. enter the recovery passphrase of controller node

11. Add candidate node section details:

a. Add as read/write pair : yes

b. Node id: unique id auto populated (leave it as is)

c. Node name: enter unique name for the candidate node; again auto populated with server name

d. cluster subgroup: keep the original here, since the DC is same and the servers are build only for HA not DR

e. cluster name: auto populated

f. IP address

g. Certificate of the candidate node:

i. open a new browser window with system admin credential; login to

https://192.168.194.123 [candidate node]

ii. First node of the cluster: No

iii. Enter recovery passphrase from controller node

iv. IP of the controller node

v. certificate of the controller node: on bottom of the original screen open already - you should see the certificate available, just copy the certificate content

vi. come back to the candidate browser node: paste the certificate from controller node

vii. now after validation of recovery passphrase and certificate, click convert to candidate node

viii. once conversion is complete, a new certificate appears on this page
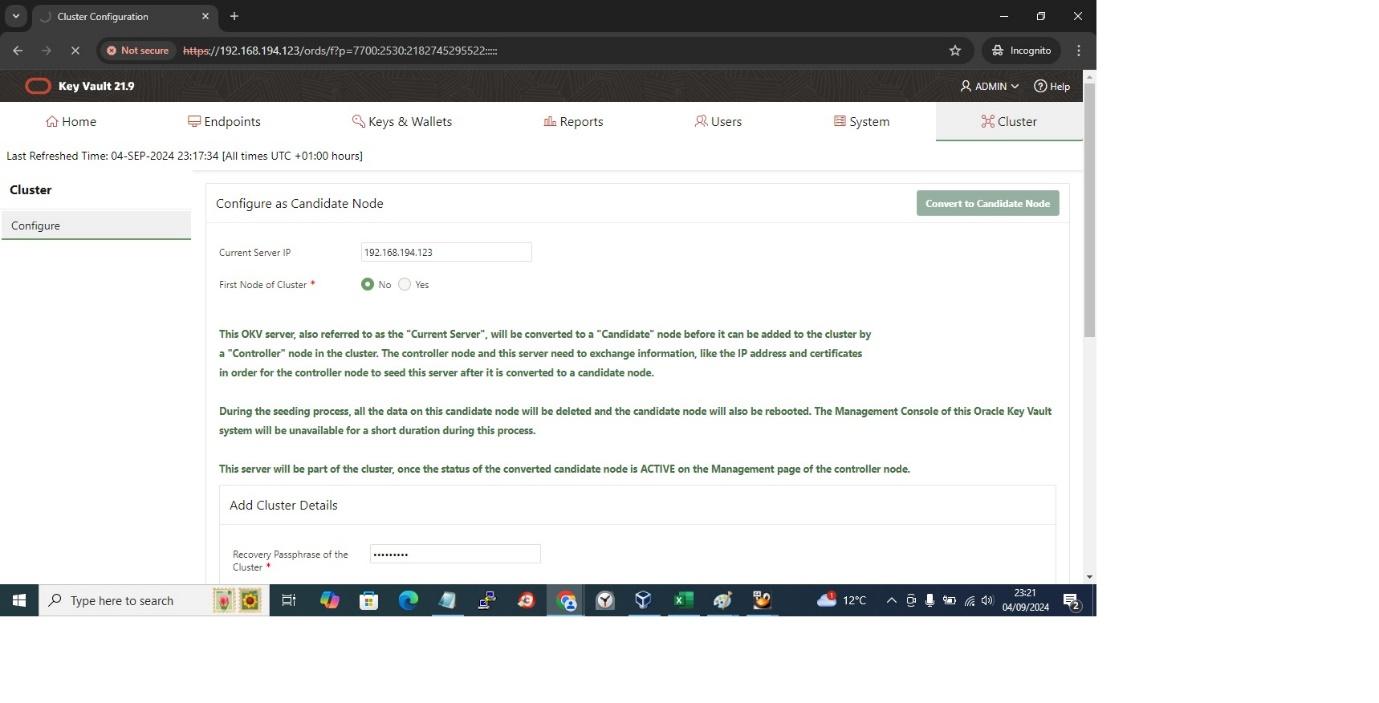


h. copy this certificate to controller node browser now, paste under candidate node certificate section

i. Click add node


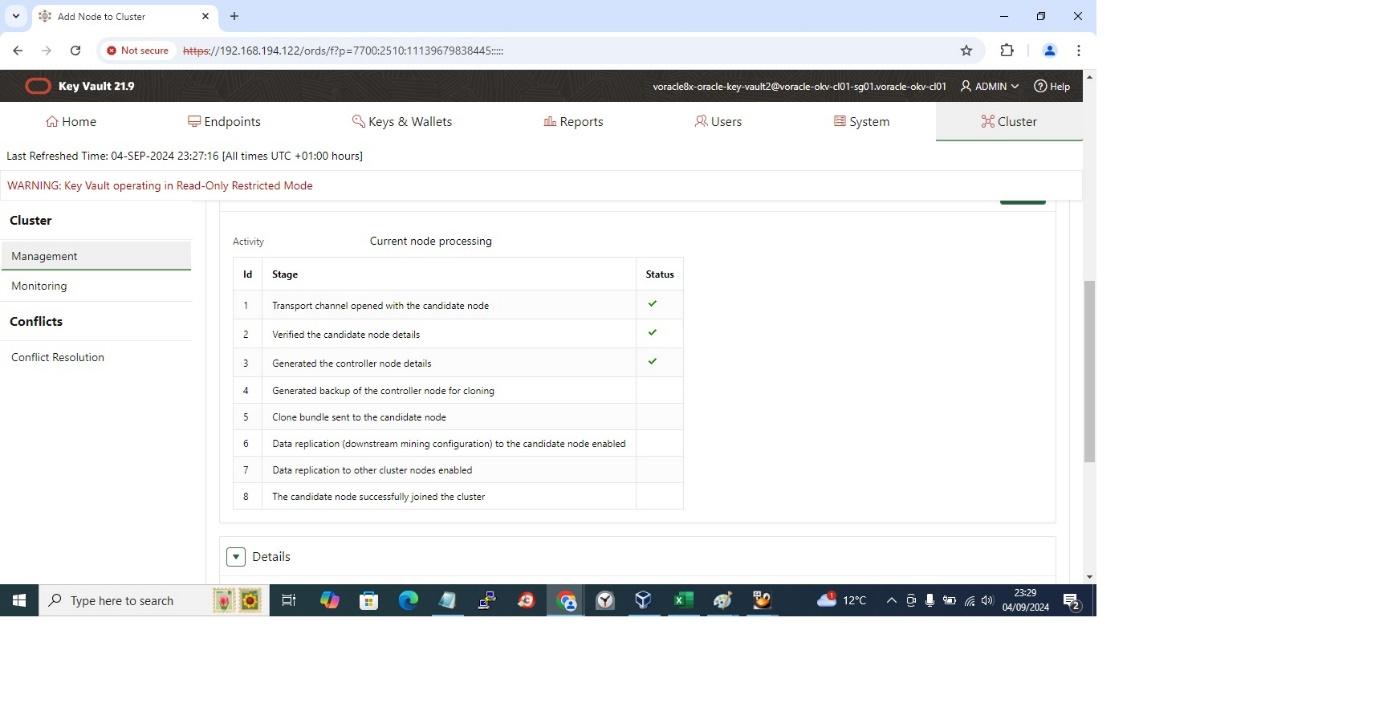
Progress track:

>>> it will take sometime (upto an hour or more based on volume of data to sync) to finish

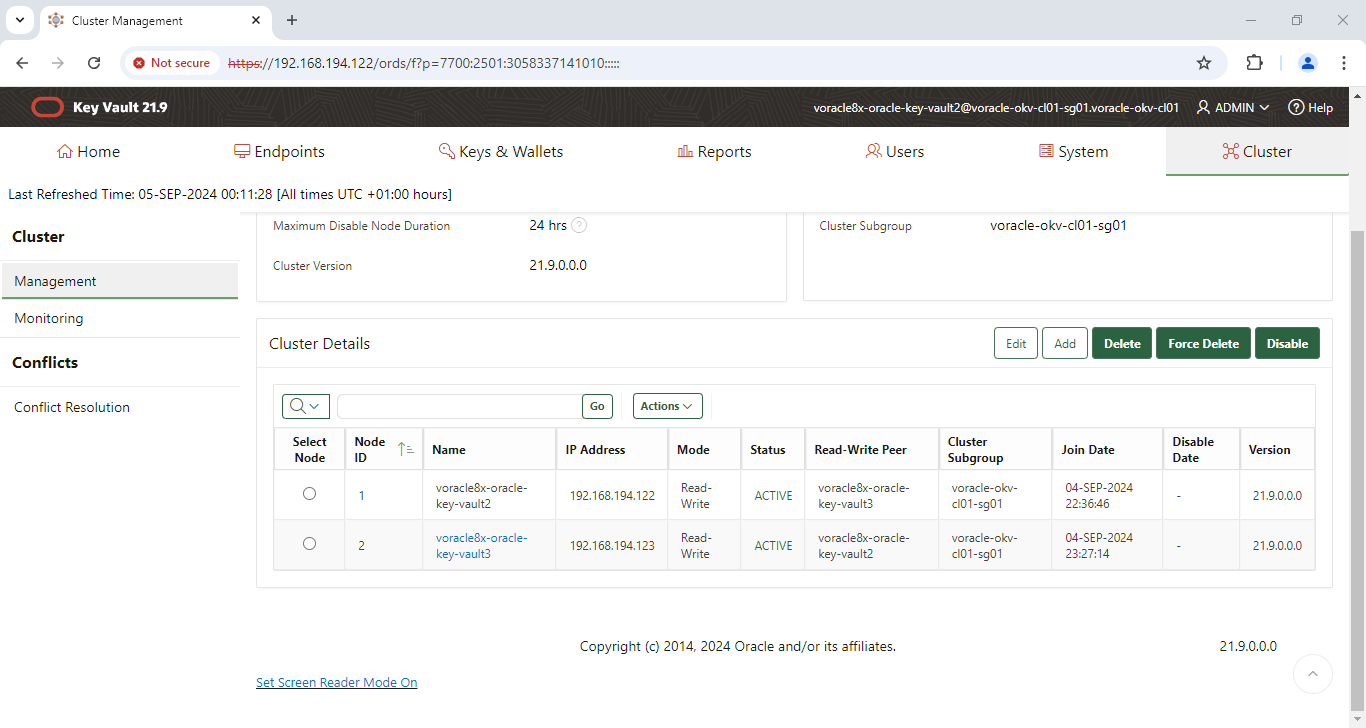
>>>once it finishes, all the nodes will be displayed as active nodes

Cluster Management - Google Chrome


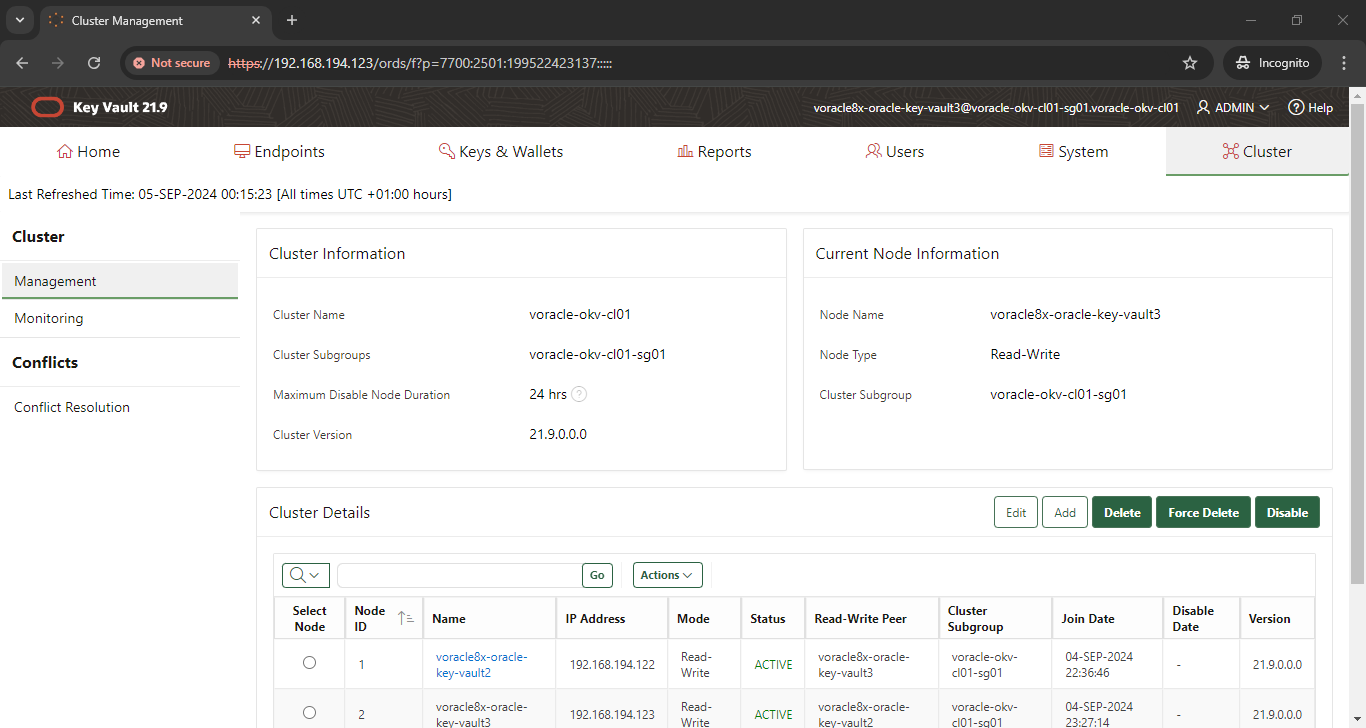
From other node:

Cluster Management - Google Chrome

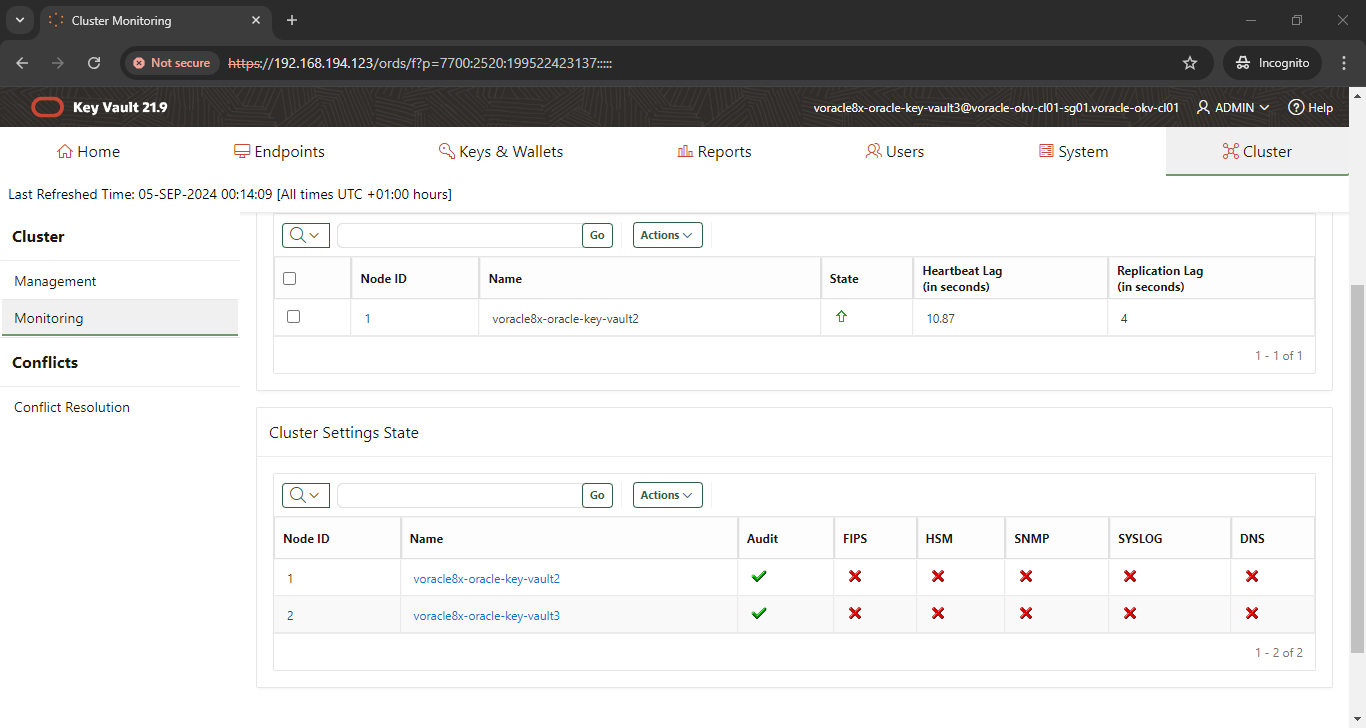
Cluster Monitoring - Google Chrome


>> secure an offline vm snap at this stage.

node1: node1_snap_04Sep2024_post_multimaster_setup

node2: node2_snap_04Sep2024_post_multimaster_setup


YouTube video:


Thanks


Tuesday, September 3, 2024

Notes: Oracle Key Vault 21.9 Multimaster cluster configuration


Configuring multimaster cluster settings for oracle key vault


url: https://docs.oracle.com/en/database/oracle/key-vault/21.9/okvag/managing_multimaster.html#GUID-C7E721E2-5438-4858-94FD-1DC3858754F0


4.0 Applying a setting across multimaster cluster involves:

1. remove node level setting to reflect the cluster level setting


4.1 Managing oracle key vault multimaster setup:

We can add, remove, disable, enable cluster nodes and manage node conflicts and replications.


4.2 Setting up a cluster:

1. convert the standalone okv to initial node

2. add more nodes as candidate nodes to cluster


4.2.1 convert the standalone okv to initial node.


4.2.2 Create first node of a cluster:

Initial node: can be either a standalone OKV setup or primary node of active-standby setup

Until a new node is added, this node acts in read - only restricted mode.


1. Login to web UI console as system admin user

http://192.168.194.122

2. Goto system tab

3. click on backup & restore

4. Ensure a remote backup is secured

5. Once remote backup finishes; go to cluster tab

6. Verify server IP

7. Select "YES" for First node of cluster option

8. Enter node name, this cant be changed later

9. Enter cluster name

10. Enter cluster subgroup name


In our case:

Clustername: voracle-okv-cl01

cluster subgroup name: voracle-okv-cl01-sg01


4.2.3 Adding nodes to the cluster:

We can add at max 1 more read write node to pair with controller or initial node.


1. Login to web UI console as system admin user

http://192.168.194.122 [controller node]

2. Goto system tab

3. click on backup & restore

4. Ensure a remote backup is secured

5. Firewall ports are opened as mentioned in OKV guide (in local lan, it shouldnt be concern)

6. Goto cluster tab

7. Click on management tab from left navigation bar

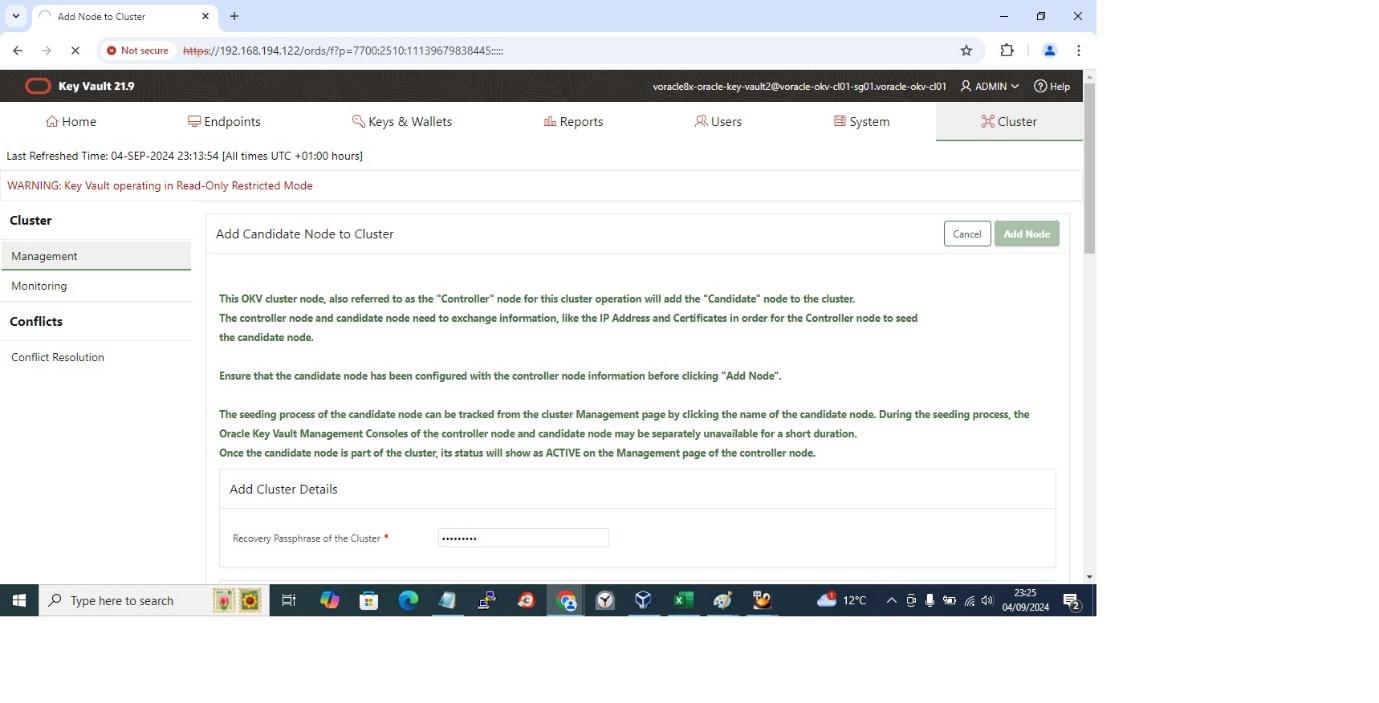
8. Click add under cluster details

9. Add cluster node details to the "add candidate node section"

10. enter the recovery passphrase of controller node

11. Add candidate node section details:

a. Add as read/write pair : yes

b. Node id: unique id auto populated (leave it as is)

c. Node name: enter unique name for the candidate node; again auto populated with server name

d. cluster subgroup: keep the original here, since the DC is same and the servers are build only for HA not DR

e. cluster name: auto populated

f. IP address

g. Certificate of the candidate node:

i. open a new broweser window with system admin credential; login to

https://192.168.194.123 [candidate node]

ii. First node of the cluster: No

iii. Enter recovery passphrase from controller node

iv. IP of the controller node

v. certificate of the controller node: open a new controller browser and on bottom of the screen - you should see the certificate available, just copy the certificate content

vi. come back to the candidate browser node: paste the certificate from controller node

vii. now after validation of recovery passphrase and certificate, click convert to candidate node

viii. once conversion is complete, a new certificate appears on this page
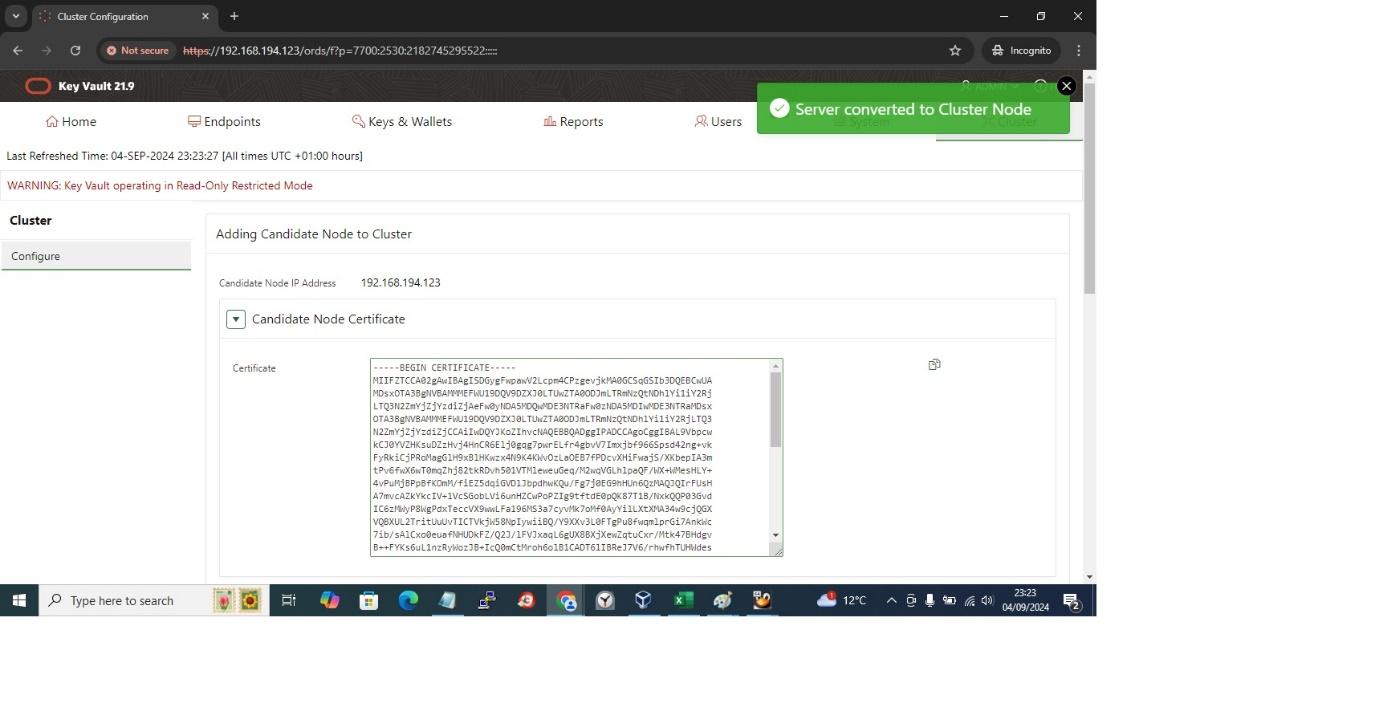
h. copy this certificate to controller node browser now, paste under candidate node certificate section

i. Click add node

Notes: Oracle Key Vault 21.9 multimaster concept


Oracle Key Vault - Multimaster setup notes:


url: https://docs.oracle.com/en/database/oracle/key-vault/21.9/okvag/multimaster_concepts.html#GUID-E1A92D83-760F-470F-877F-D769169C6ABC


3.1 Multimaster overview: 

1.High available, load distribution, disaster recovery, geographical distribution

2.smallest is a node 2 node cluster and largest is 16 node cluster

3.the update to security object is successful only after the replication between RW pair is successful


3.2 Benefits of multimaster setup:

1.standalone OKV offers least availability vs active-standby offers limited availability vs read/write (active-active) - pairs offer max availability 

2.persistent cache is optional in multimaster environment vs in other deployment modes it is mandatory

3.mutimaster (Active-active) offers HA and dR

4.maintenance operATIONS can be conducted online (both hardware and software)


3.3 Multimaster architecture

cluster node : individual OKV node or server; the process of converting an individual node to a cluster node is called induction

cluster limitation: multimaster replicate data in async. IP add is static, node remove/add is needed.Only one cluster operation at a time is possible [adding, disabling, deleting]

cluster subgroup: subset of nodes in the cluster, used for node affinity; nodes in the same subgroup are used in the search order first (considering them to be local to the endpoint); it isnt manadtory the read-write pair goes into 1 subgroup.

critical data: all endpoint data which are needed for the operation of db system or other security system are considered critical data and the ones which can be recreated @ OKV are non critical. The critical data is kept replicated amongst read-only and read-write pair as well.

RW pair - Replication between read write : Synchornous & with other nodes it is asynchoronous. This way we can be sure data is available in atleast 2 nodes.

Read only: affects only non critical data change; also the only RW pair goes to read only mode in case RO node is unavailable.

Based on the operating mode of the node: the operations permitted will change


3.4 Building multimaster cluster

Node which becomes first member of the cluster : first node or controller node

First node or Initial node: supplies the data; which will be replicated to other nodes [this node can be a fresh data or existing setup, existing setup in active - standby config]

Expansion of cluster: controller node inducts further nodes in RW mode or READ only mode further

Management of cluster reconfig: one cluster reconfig at a time allowed, only 1 controller node per cluster allowed (refer to picture 9)


Cluster Configuration Operation

Controller Node

Node Being Controlled

Induction as the first node

Any server

The controller node itself

Induction as a read-only node

Any node

Any server

Induction as a read-write node

Any node that does not have a read-write peer

Any server

Disable a node

Any node in the cluster

Any node in the cluster

Enable a node

Only the disabled node can re-enable itself

The disabled node itself

Delete a node

Any node in the cluster

Any other node in the cluster

Force Delete a node

Any node in the cluster

Any other node in the cluster

Manage inbound replication

Any node in the cluster

The node itself


Addition of more nodes in multimaster cluster: Node 2 becomes restricted read only until the new node (N2) is added  in cluster with node 1 (N1). The controller node can read write pair with other node in the cluster; further nodes will become rw pairs of their own.

conversion of the existing OKV: if the version of existing setup is latest, we can just convert the existing node to an initial node of the cluster.

convert physical-standby node: break the physical standby config, upgrade to latest release and then attempt to convert primary to initial node role.


3.5 Deployment scenarios

size: small 2 node to large 16 node cluster

2 node cluster vs 4 node cluster: both machines going offline is a concern in 2 node cluster vs in 4 node it isnt concern. hence with more nodes the risk of downtime reduces


3.6 features of multimaster cluster:

cluster inconsistency resolution: network disruption happens, then the nodes voluntarily or involuntarily gets disconnected from the cluster; if the issue resolves within 24hrs (Default disconnect max duration), the cluster will come to sync again by replicating the data collected during disconnect window.

name conflict resolution: cluster will automatically correct same names given in both the rw pairs by mistake by appending _okvnn (nn is node id), we can accept it by going to cluster -> name resolution page.

Endpoint node connection lists (endpoint node scanlist): list of all nodes an endpoint should scan to connect in a multimaster cluster - the scan list is automatically maintained by the cluster


3.7 cluster management information:

cluster management information: is the page which provides an overview of the cluster with all the nodes listed

a. cluster name

b. cluster sub group name

c. max disconnect interval

d. node list

e. node type

f. node id

g. node name

h. node ip

i. cluster version

j. node version

k. replication lag